
How to Setup SSH Stunnel Server on HTTP Injector | TLS/SSL VPN Configuration Tutorial
In the domain of network encapsulation and bypassing restrictive firewalls, combining Secure Shell (SSH) with SSL/TLS wrapper encryption provides an ultra-secure transport layer. **HTTP Injector** is a highly versatile Android client that supports custom payloads and proxy routing. By creating a dedicated **SSH Stunnel Server** (which wraps SSH traffic in TLS/SSL encryption) and importing the parameters into HTTP Injector, users can establish robust, secure tunnels.
This technical guide details how to generate free SSH Stunnel credentials on SSH Ocean and manually configure the connection inside the HTTP Injector client.
Table of Contents
- Video Tutorial
- Step 1: Generating an SSH Stunnel Server Account
- Step 2: Configuring HTTP Injector Client
- Step 3: Establishing the Tunnel Connection
- Frequently Asked Questions & Troubleshooting
Video Tutorial
Step 1: Generating an SSH Stunnel Server Account
First, create a high-speed SSH account wrapped in SSL/TLS (Stunnel) using a public provider:
- Open your web browser and navigate to the official SSH Ocean website.
- Tap the menu navigation icon in the top corner and select **Services**, then select **SSH Stunnel**.
- Click on **Select Location** and choose the region closest to you (e.g. Asia or Europe) to ensure low latency.
- Choose an active server from the list, input a custom username and password, complete the anti-bot check, and tap **Create**.
- Once generated, copy the server details (Host IP/Domain, Port, Username, and Password) to your clipboard.
Step 2: Configuring HTTP Injector Client
With the account active, configure HTTP Injector to handle the Stunnel protocol:
- Install and launch **HTTP Injector** from the Play Store.
- On the home dashboard, tap the **Tunnel Type** button.
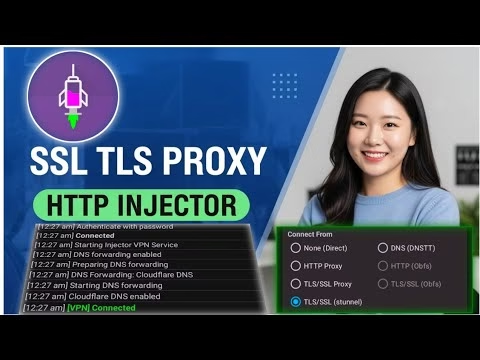
- Select **Secure Shell (SSH)** as the primary transport protocol, and select **TLS/SSL (Stunnel)** as the connection method. Tap **Save**.
- Open the side menu (three horizontal bars) and select **SSH Settings**.
- Enter the copied Host IP, SSH Port (usually 443 or 442 for Stunnel), Username, and Password in the respective input fields.
Step 3: Establishing the Tunnel Connection
Return to the main home screen. Under the payload config, you can specify a Server Name Indication (SNI) host to bypass local carrier blocks if required. Tap the **Start** button to connect. Review the live connection logs in the terminal. When the log displays a successful handshake and shows “Tunnel is running”, your traffic is fully encrypted through the TLS/SSL tunnel.
Frequently Asked Questions & Troubleshooting
1. Why does my Stunnel connection fail with a handshake timeout?
This is often caused by an incorrect port number. Standard SSH uses port 22, but Stunnel wrapping requires the SSL port specified by the server provider (usually 443 or 442). Ensure you check the port number generated on the server creation page.
2. What SNI should I configure in HTTP Injector?
The SNI (Server Name Indication) is the domain name the client presents during the TLS handshake. To bypass carrier restrictions, specify a domain that is zero-rated or whitelisted on your carrier network. If you only need encryption, you can use any valid public host (e.g. www.cloudflare.com).
3. How long does the generated server account remain active?
Free accounts on SSH Ocean typically remain active for 3 to 7 days. Once the account expires, return to the portal, generate a fresh account, and update the username/password in your HTTP Injector settings.