
Setting Up Ubuntu RDP Using Google Colab
Setting Up Ubuntu RDP Using Google Colab
Introduction
Remote Desktop Protocol (RDP) offers a convenient solution for accessing a computer remotely. In this comprehensive guide, we’ll walk you through the process of establishing a working Ubuntu RDP using Google Colab. With clear and detailed steps, you’ll be able to create your own remote desktop environment effortlessly.
Accessing Google Colab
Begin by opening your laptop’s browser and navigating to Google Colab. Simply type “Google Colab” into the search bar and press enter. Click on the official Google Colab website link from the search results to proceed.
Opening a Notebook
Once on the Google Colab website, locate and click on the “Open Notebook” button to initiate the setup process.
Creating a New Notebook
A pop-up screen will appear after clicking “Open Notebook.” Proceed by clicking on “New Notebook” to create a new notebook where you’ll execute the necessary code.
Accessing the Tutorial Code
To obtain the tutorial code required for setting up Ubuntu RDP using Google Colab, click the button below:
Executing Code Cells
Within the notebook, each code cell features a play button on the left side. Click on the play button to execute the code contained within the cell. You can either follow the provided link or manually copy the code snippets into your new notebook for execution.
Copying Code Cells to Your Notebook
Alternatively, you can choose to copy the code cells from the tutorial notebook into your newly created notebook. Click on “File” in the top header menu, then select “New Notebook” from the submenu. Once your new notebook is loaded, copy each cell from the tutorial notebook to yours.
Executing Code Cells One by One
After copying the code cells into your notebook, proceed to execute each cell one by one. Start with the first cell and click on the play button. Ensure that your runtime is connected, and wait for each cell’s execution to complete before proceeding to the next.
Following On-Screen Instructions
Throughout the execution of code cells, be attentive to any on-screen instructions provided. Some steps may require additional time for processing, so exercise patience during the setup process.
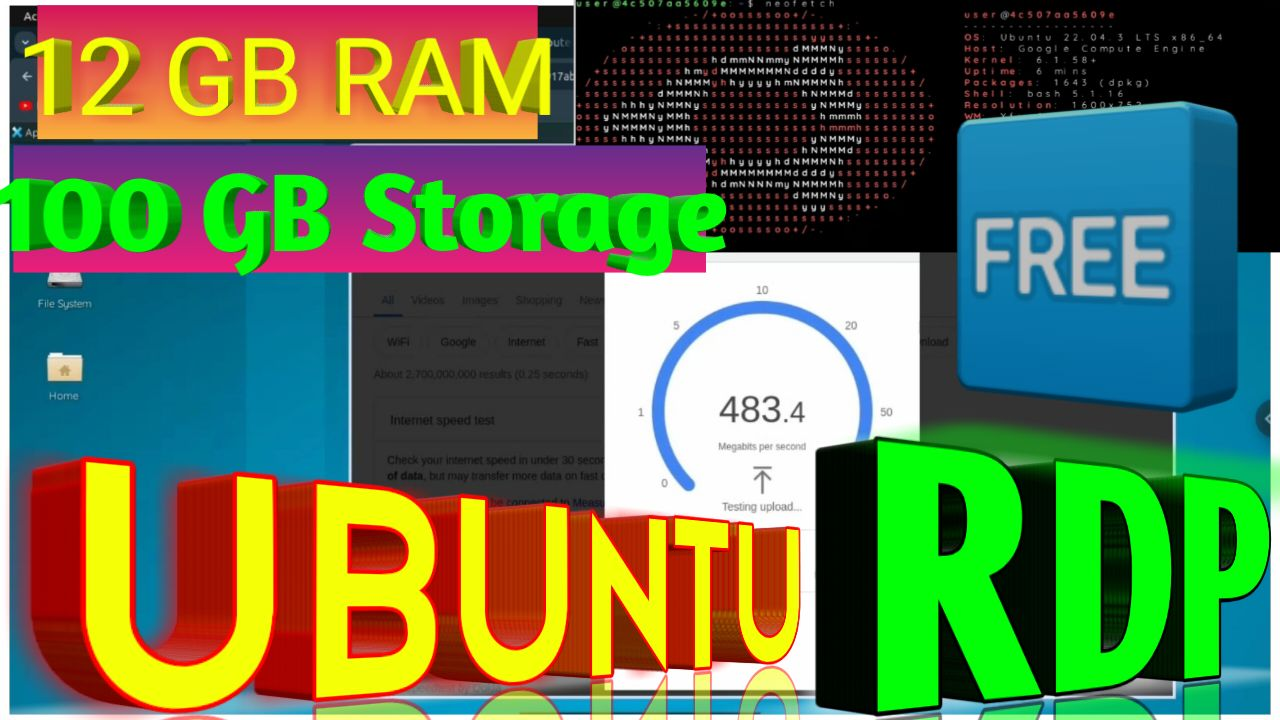
Checking RDP Speed
After completing the setup, it’s important to assess the speed of your Ubuntu RDP. Launch the Chrome browser and conduct a speed test to evaluate the network performance.
Verifying RAM and Storage
To verify the RAM and storage configuration of your RDP, open the terminal and execute the “neofetch” command. If the command isn’t installed by default, install it using “sudo apt-get install neofetch.” Follow the prompts, including entering the root password if required, to install the command.
Conclusion
Congratulations! You’ve successfully established a working Ubuntu RDP using Google Colab. By following these step-by-step instructions, you’ve gained valuable insight into creating a remote desktop environment for your computing needs.
Frequently Asked Questions (FAQs)
- Q: Can I use any browser to access Google Colab?
- Q: Do I need to create an account to use Google Colab?
- Q: Is Google Colab free to use?
- Q: Can I run other programming languages besides Python in Google Colab?
- Q: Are the resources provided by Google Colab limited?
- Q: Can I collaborate with others on a notebook in Google Colab?
- Q: How secure is my data on Google Colab?
- Q: Can I access Google Colab on mobile devices?