
How to Setup WireGuard VPN on Windows | Complete Beginner Tutorial (Free & Easy)
In modern network administration and digital connectivity, configuring secure transmission lines is key to maintaining privacy and optimal data performance. This comprehensive guide focuses on How to Setup WireGuard VPN on Windows | Complete Beginner Tutorial (Free & Easy), outlining the exact configuration parameters, setup workflows, and troubleshooting methods required to deploy this solution successfully.
Table of Contents
- Video Tutorial Walkthrough
- Step 1: System Requirements & Prerequisites
- Step 2: Configuration & Implementation Steps
- Step 3: Verification & Latency Testing
- Frequently Asked Questions & Troubleshooting
Video Tutorial Walkthrough
Step 1: System Requirements & Prerequisites
To configure and run the setup described in the tutorial, ensure you have the following prerequisites prepared in your work environment:
- An Android or iOS mobile device with stable internet access.
- The latest client application package installed from the official repository (Google Play Store).
- Access to custom configuration files or server account details (Host, Port, Username, Password).
Step 2: Configuration & Implementation Steps
Welcome to 12_5tech. , I will guide you step by step on how to set up WireGuardVPN on your Windows PC in the easiest and most beginnerfriendly way possible. By the end of this tutorial, you’ll be able to create your own secure WireGuard connection absolutely free using SSH Ocean.
Let’s get started. First, open any browser on your Windows computer and in the search bar, type WireGuard. Once the results appear, click on the official WireGuardVPN homepage.
on the website. Go to the installation menu and click on download Windows installer to start downloading the setup file. When the installer has been downloaded, open it and follow the on-creen instructions to install WireGuardVPN.
The installation may take a few minutes. Once installed, the app will launch automatically and you’ll see its main interface. Now, let’s create a free WireGuardVPN server using SSH Ocean.
Open a new browser tab and search for SSH Ocean. Click on the official website to visit its homepage. From the menu at the top, select services and then choose WireGuardVPN from the submen.
You’ll now be redirected to a page where you can select your preferred server location from the list of countries. For this tutorial, I’ll select Australia. Tap on choose location and then select any server available under that region to proceed.
On the next page, enter your username and password. Complete the recapture and then tap the create server button. Within a few seconds, your free WireGuard server will be created successfully.
Once the server is ready, you’ll see its connection details displayed on the screen. You can either copy the configuration or download it directly. It’s better to download the configuration file to use it easily in the WireGuard app.
Now open WireGuardVPN on your computer. Tap on import config and navigate to your downloads folder. Select the WireGuard configuration file you just downloaded to import it.
Once imported, the configuration will appear in the app. Now you’re ready to connect. Tap the activate button on the right side to start the VPN using your imported configuration.
You’ll see connection logs on the left side. And once connected successfully, a notification will appear in your taskbar showing that WireGuard is active. Next, let’s learn how to set up WireGuard manually instead of using a pre-made configuration file.
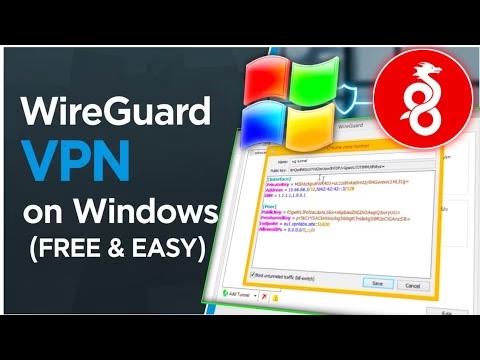
On the left side of the WireGuard window, click on the arrow next to add tunnel and from the drop-own menu, select add empty tunnel. A new window will appear. Enter a name for your configuration.
Paste your WireGuard details inside and tap save. save. Finally, to confirm that your VPN connection is working correctly, visit what is my IP address in your browser.
You’ll notice that your IP now matches the location of the server you created earlier, proving your VPN setup is working perfectly. Thank you for watching. I hope this tutorial helped you easily set up WireGuardVPN on your Windows PC.
If you found this video useful, please give it a thumbs up, share it with your friends, and don’t forget to subscribe to the channel for more tech tutorials. See you in the next one.
Step 3: Verification & Latency Testing
Once the initial setup and configuration steps are completed, verify the connection status:
- Toggle the master connection switch in the client app dashboard.
- Monitor the live connection log. It should show a successful handshake and display a ‘Connected’ status.
- Navigate to a public IP verification tool (e.g. whoer.net) to verify that your original IP address is masked.
Frequently Asked Questions & Troubleshooting
1. Why is the connection failing with an SSH/UDP timeout?
This is usually due to a blocked port or expired server account credentials. Double-check that your server credentials are active. If they are, try changing the connection port or switching server nodes within the app settings.
2. How do I update the built-in carrier tweak configurations?
To load the latest tweak profiles, connect to a stable network, open the side menu inside the application, and select Update Config. The client will query the remote server and fetch the latest configs.
3. How can I resolve background connection drops?
Ensure that the application is excluded from Android battery optimizations. In your device’s settings, locate the app, navigate to battery usage parameters, and toggle the setting to Unrestricted to allow background processes.