
How to create HTTP Injector & OpenVPN configs
- Introduction to Advanced Network Tunneling
- Step 1: Provisioning Secure Server Credentials
- Step 2: HTTP Injector Configuration – Standard SSH Tunneling
- Step 3: Elevating Connections via WebSocket HTTP Upgrade
- Step 4: Securing Traffic with Stunnel SNI (TLS/SSL Proxy)
- Step 5: Deploying Standalone OpenVPN Connect Profiles
- Frequently Asked Questions & Technical Troubleshooting
Introduction to Advanced Network Tunneling
Modern network infrastructures often enforce restrictive firewalls, deep packet inspection (DPI), or geographic limitations. Network administrators and security enthusiasts leverage custom tunneling protocols to bypass these constraints, encapsulating traffic securely to preserve privacy and optimize routing path efficiency. By utilizing tools like HTTP Injector and OpenVPN Connect, you can build customized tunnels that leverage Secure Shell (SSH), WebSockets, and TLS-encrypted SNI (Server Name Indication) custom framing.
This technical guide details how to build and orchestrate these configurations from the ground up. We will cover server provisioning, standard SSH configuration, WebSocket handshake manipulation, Stunnel encryption, and standalone OpenVPN deployment.
Step 1: Provisioning Secure Server Credentials
Before initiating any client-side configuration, you must provision an active endpoint on a remote virtual private server (VPS). This server acts as the secure gateway terminating your tunneled traffic.
- Access the Portal: Open your web browser and search for
OpenVPN SSH. Navigate to the official provisioning dashboard. - Locate Account Creation: From the primary navigation menu, click on the SSH/VPN drop-down menu and select Create Account.
- Select Server Location: Review the available global clusters. For optimal throughput and minimal latency, select a high-performance cluster such as the France Genius 5 SV server and click Create User.
- Define Credentials: In the configuration form, input a unique username and a highly secure password. Set the “Bug/SNI” option to Custom, as we will define these parameters manually on our clients.
- Export Details: Click the green Create User button. Once the portal processes the request, copy the generated Server IP Address, Username, and Password directly to your clipboard or secure password manager.
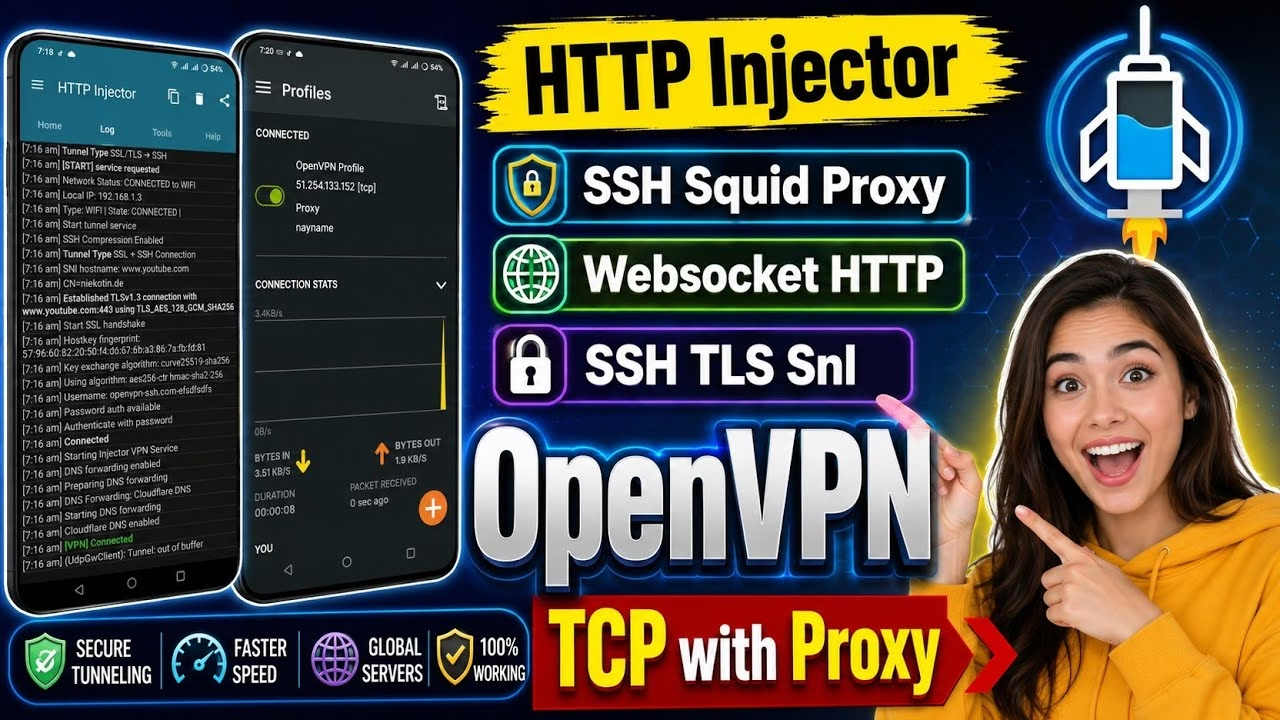
Step 2: HTTP Injector Configuration – Standard SSH Tunneling
HTTP Injector is a sophisticated packet injection tool that allows custom header manipulation. Our first transport layer configuration establishes a raw Secure Shell (SSH) connection bridged via an HTTP proxy payload.
First, install HTTP Injector from the Google Play Store and launch the application. To initialize the SSH architecture, apply the following settings:
- Tunnel Type Selection: Tap the Tunnel Type selector on the main interface. Choose Secure Shell (SSH) and ensure the Custom Payload checkbox is enabled. Tap Save.
- Configure SSH Settings: Access the application settings by tapping the gear icon. Navigate to SSH Settings and input your server details:
- SSH Host: Paste your server’s IP address.
- Port: Set to
143(the designated port for standard SSH bypass on this host). - Username / Password: Enter the exact credentials saved in Step 1.
- Generate the Payload: Return to the main screen and select the Payload Generator tool. Configure the parameters exactly as follows:
- URL/Host:
yourcustomtunnel.com(or your target carrier’s zero-rated domain). - Request Method:
CONNECT - Injection Method:
Normal - Click Generate Payload to build the raw HTTP connection header string.
- URL/Host:
- Set Remote Proxy: Tap the Remote Proxy configuration panel.
- Proxy IP/Host: Input your server’s IP address.
- Port:
80 - Click Save.
To establish the connection, tap the Start button on the home screen and navigate to the Log tab. Upon initialization, you should observe the socket handshake negotiate and establish a successful connection:
[Status] Connecting to remote proxy...
[Status] Injecting payload...
[Status] HTTP/1.1 200 Connection Established
[Status] SSH Handshake Successful - Tunnel Active
Step 3: Elevating Connections via WebSocket HTTP Upgrade
If strict network firewalls block standard SSH handshakes, WebSockets offer a highly resilient alternative. This protocol operates over standard HTTP/HTTPS ports (80/443), masquerading your tunnel traffic as standard web application communications.
- Navigate to the SSH Settings menu inside HTTP Injector and change the SSH Port value from
143to80. - Return to the main screen. In the custom payload area, clear the existing raw text and insert your designated WebSocket payload format. A standard upgrade-demanding payload structure resembles:
GET / HTTP/1.1[crlf]Host: yourcustomtunnel.com[crlf]Upgrade: websocket[crlf]Connection: Upgrade[crlf][crlf]- Ensure your Remote Proxy is still mapped to your server IP on Port
80. - Tap Start and open the Log window. Monitor the connection logs for a successful protocol upgrade:
[Status] Sending WebSocket Handshake...
[Status] Connection upgraded to WebSocket protocol.
[Status] HTTP/1.1 101 Switching Protocols
[Status] WebSocket Tunnel established successfully.
Step 4: Securing Traffic with Stunnel SNI (TLS/SSL Proxy)
For networks employing deep packet inspection (DPI) to identify and block unencrypted HTTP and WebSocket handshakes, wrapping your tunnel in Transport Layer Security (TLS) is critical. Utilizing Stunnel with SNI (Server Name Indication) spoofs secure handshakes to highly trusted domains like facebook.com.
- Reconfigure Tunnel Type: Tap the Tunnel Type selection bar. Change the primary connection engine to TLS/SSL Proxy (Stunnel).
- Modify SSH & Proxy Ports: Access your SSH Settings and change the connection port to
443(the standard port for HTTPS/TLS traffic). Ensure your remote proxy port is also updated to443. - Define SNI Target: In the newly visible Server Name Indication (SNI) or Server Spoof Host input field, enter a valid host name (e.g.,
facebook.com). This ensures DPI monitors see a normal encrypted handshake to a trusted CDN or web portal. - Establish the Connection: Save the configuration and tap Start. The logs will display the SSL socket negotiation, demonstrating a strong cryptographic handshake:
[Status] Initiating SSL/TLS Handshake...
[Status] Local SSL Certificate Handshake completed.
[Status] TLS v1.3 Connection Established (SNI: facebook.com)
[Status] Encrypted Tunnel successfully negotiated.
Step 5: Deploying Standalone OpenVPN Connect Profiles
For system-wide VPN routing without relying on third-party header injectors, deploying a native OpenVPN tunnel is the preferred industry standard. This requires downloading an official client profile and injecting custom proxy settings.
- Install OpenVPN Connect: Download and install the official OpenVPN Connect app from the Google Play Store or Apple App Store.
- Download the Configuration Profile: Return to the credential generation web portal. Tap on the ovpn_configs directory link. Locate and download the TCP-based profile:
client_tcp_1195.ovpn. - Import to Client: Open OpenVPN Connect, select the File tab, browse to your downloaded configuration file, and import it into the client application.
- Input User Credentials: Enter the exact username and password generated during Step 1. Enable the Save Password checkbox to store these details securely.
- Inject Proxy Layer: Tap the edit pencil icon next to your imported profile. Scroll down to the Proxy settings panel:
- Set the proxy configuration to Manual or Custom.
- Proxy Host: Input your remote server’s IP address.
- Proxy Port:
80
- Initiate Tunneling: Toggle the profile switch to the ON position. If a certificate warning dialog appears, tap Continue. Within moments, the real-time throughput metrics will populate, indicating a stable OpenVPN TCP connection routed successfully via an HTTP proxy.
Frequently Asked Questions & Technical Troubleshooting
1. Why am I seeing a “Connection Timeout” or “Refused” error in HTTP Injector?
This is commonly caused by an incorrect remote proxy IP or port mismatch. Double-check that your server’s IP is entered correctly. Additionally, ensure the port you selected (e.g., 143, 80, or 443) is open on your remote VPS. Some network carriers actively block port 80; if so, try switching to an SSL/TLS tunnel on port 443.
2. What is the advantage of UDP profiles over TCP in OpenVPN Connect?
TCP profiles require a complete three-way handshake and guarantee packet delivery, making them highly reliable for passing through strict web proxies. However, UDP profiles do not wait for packet receipt confirmations, which dramatically reduces protocol overhead. For high-bandwidth activities like gaming or video streaming, downloading the UDP configuration file from the web portal will yield significantly faster throughput.
3. How does SNI spoofing work, and why is the host domain important?
Server Name Indication (SNI) is a TLS extension indicating which hostname the client is trying to connect to at the start of the handshaking process. Network firewalls often allow free access to zero-rated domains (such as social networks or carrier portals). By setting your SNI to facebook.com, the firewall assumes you are communicating with an approved destination and allows your encrypted tunnel packets to pass through without interference.