
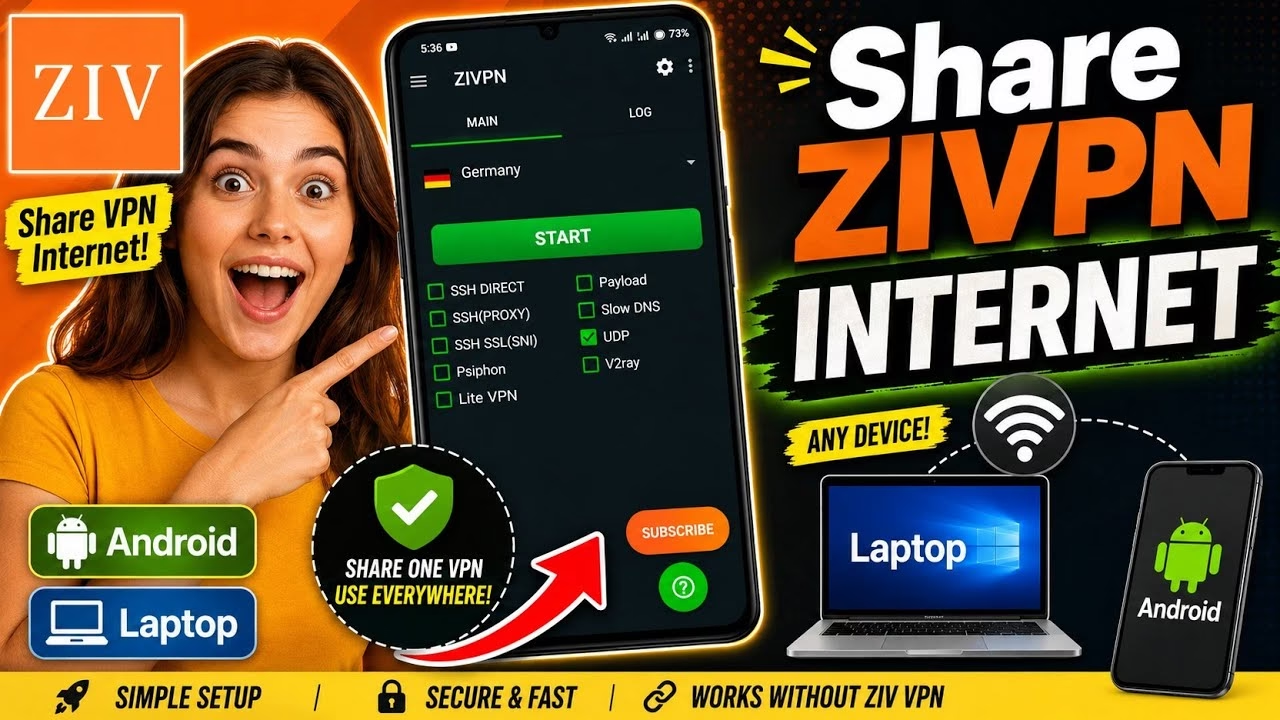
How to share ZIVPN UDP INTERNET to other devices
Table of Contents
- 1. Introduction: Bypassing Tethering Restrictions
- 2. System Requirements and Prerequisites
- 3. Step 1: Configuring ZIVPN for Local Sharing
- 4. Step 2: The Critical Ordering Sequence (Hotspot First)
- 5. Step 3: Launching the Secure Tunnel and Proxy Server
- 6. Step 4: Configuring Client Devices (Windows, Android, macOS)
- 7. Under the Hood: How Local Proxy Bridging Works
- 8. Technical FAQ and Troubleshooting
1. Introduction: Bypassing Tethering Restrictions
In modern enterprise and remote networking environments, secure tunneling protocols such as V2Ray, VMess, and custom UDP wrappers are essential tools for safeguarding data. However, a common technical limitation arises when trying to share an active Virtual Private Network (VPN) connection from an Android smartphone to secondary devices like laptops, tablets, or smart TVs. By default, native Android tethering (via Wi-Fi Hotspot) bypasses the active parent VPN interface, routing client traffic directly through the unencrypted cellular interface. This exposes secondary device traffic to carrier inspection, throttling, or outright blockages.
To overcome this limitation without root-level access or the overhead of installing complex VPN clients on every secondary device, network administrators leverage local proxy bridging. This guide provides an authoritative, step-by-step methodology to encapsulate and route your entire local hotspot network through an active ZIVPN tunnel using the VPN Share utility. By transforming your host Android device into a localized gateway, you can bypass carrier tethering restrictions and distribute secure, high-speed UDP internet across your entire hardware ecosystem.
2. System Requirements and Prerequisites
Before initiating the configuration, ensure you have the following components prepared:
- Host Android Device: Running Android 8.0 or higher with a functioning SIM card and an active cellular data plan.
- ZIVPN Tunnel App: Installed via the Google Play Store, configured with a verified, working UDP or V2Ray server configuration that can successfully resolve DNS and transfer WAN traffic.
- VPN Share App: Developed by iOrgna Software (available on the Google Play Store). This acts as the local proxy broker, binding the VPN’s tun0 virtual interface to the local area network (LAN) interface of your hotspot.
- Target Client Device: Any workstation, laptop (Windows/macOS/Linux), or mobile device capable of connecting to Wi-Fi and supporting manual HTTP/SOCKS proxy configurations.
3. Step 1: Configuring ZIVPN for Local Sharing
To enable ZIVPN to broadcast its decrypted tunnel traffic to other local interfaces, you must explicitly enable its internal proxy sharing configuration. This flag instructs the application to listen for local socket connections and permit traffic routing from internal subnets.
- Launch the ZIVPN application on your Android host device.
- Locate and tap the Menu (three-dot icon) in the upper right-hand corner of the user interface.
- Select Misc Settings from the dropdown menu to enter the advanced configuration panel.
- Scroll down to find the configuration option labeled Share VPN.
- Check the box to toggle this setting on. Enabling this feature changes how the application binds its virtual interfaces, allowing local traffic loopbacks to access the ZIVPN interface.
4. Step 2: The Critical Ordering Sequence (Hotspot First)
A frequent failure point in local proxy configuration is the order in which network interfaces are initialized. If you start the ZIVPN tunnel before enabling the Wi-Fi hotspot, the Android routing table will not properly associate the host’s virtual interface (tun0) with the wireless access point interface (typically wlan1 or ap0). To prevent this, you must strictly adhere to the following setup sequence:
- Ensure ZIVPN is completely stopped (the main interface should display a green START button).
- Pull down the Android System Quick Settings shade.
- Tap to activate your Mobile Hotspot. Ensure your hotspot SSID and password are configured securely (using WPA2-PSK or WPA3 personal encryption).
- Verify that the hotspot is actively broadcasting. Your phone is now acting as a local DHCP server, ready to assign private IP addresses (typically in the
192.168.43.0/24or192.168.49.0/24subnets) to incoming connections.
5. Step 3: Launching the Secure Tunnel and Proxy Server
With the physical wireless interface broadcasting, you can now safely initialize your VPN tunnel and bridge it to the local socket server.
- Return to the ZIVPN application dashboard.
- Tap the central START button. The application will initialize handshake protocols with your remote UDP or V2Ray server.
- Wait until the interface changes to show an orange STOP status and your system status bar displays the VPN key icon. This confirms that all WAN-bound traffic on the host device is successfully routed through your secure tunnel.
- Exit ZIVPN and open the VPN Share application.
- Flick the master toggle switch in the top right corner of the screen to start the proxy service.
- The status display will transition to RUNNING. Analyze the screen and document the following two values:
- Proxy IP Address: Typically the default gateway of the hotspot subnet (e.g.,
192.168.43.1). - Proxy Port: The active TCP socket port allocated by the app (e.g.,
1080or8080).
- Proxy IP Address: Typically the default gateway of the hotspot subnet (e.g.,
6. Step 4: Configuring Client Devices (Windows, Android, macOS)
For a client device to access the internet, it must be explicitly instructed to redirect all outbound HTTP and TCP sockets through the host’s proxy port rather than attempting to route straight out to the WAN.
Configuring a Windows Laptop / PC
- Click the Wi-Fi icon in your system tray and connect to the Android Hotspot network.
- Once connected, press the
Windows Key + Ito open the Settings menu. - Navigate to Network & internet > Proxy.
- Under the “Manual proxy setup” section, click Set up next to “Use a proxy server”.
- Toggle Use a proxy server to ON.
- In the Proxy IP address field, input the exact IP address displayed in VPN Share (e.g.,
192.168.43.1). - In the Port field, enter the corresponding port number (e.g.,
1080). - Click Save. All browser, file transfer, and communication traffic on your PC will now route through the encrypted ZIVPN tunnel.
Configuring a Secondary Phone (Android / iOS)
- Navigate to your Wi-Fi settings and connect to the host’s hotspot.
- Long-press the connected network SSID and select Modify Network or tap the information (
i) icon next to the network name. - Expand the Advanced Options drop-down menu.
- Locate the Proxy setting and switch it from None to Manual.
- In the Proxy hostname field, enter the documented IP address.
- In the Proxy port field, enter the port number.
- Tap Save or Apply to apply the configurations.
7. Under the Hood: How Local Proxy Bridging Works
To understand why this process is so effective, we must look at the underlying packet flow. In a standard Android environment, the operating system uses Network Address Translation (NAT) to forward packets from the hotspot interface directly to the physical cellular interface. This cellular interface is monitored by your Mobile Network Operator (MNO).
When a standard VPN is turned on, it creates a virtual point-to-point interface (usually designated as tun0). Android’s routing table directs local system applications to send their packets to tun0. However, the system’s NAT engine for tethering still points directly to the physical WAN interface, effectively bypassing the VPN. This is done by OS design to prevent accidental routing loops and preserve bandwidth.
The VPN Share application acts as a middleman. By opening a local port on the host’s loopback/hotspot gateway IP (e.g., 192.168.43.1:1080), it listens for incoming HTTP and SOCKS traffic. When your client PC sends a packet, it targets this proxy socket directly. The VPN Share app accepts these packets, processes them locally within the user space of the host Android OS, and hands them off to the active ZIVPN tunnel (acting as an application on the device). The ZIVPN tunnel then encapsulates and encrypts the data before sending it safely out to the cellular network, completely obscuring the traffic’s source and payload from the ISP.
8. Technical FAQ and Troubleshooting
Q1: Why is my client device showing “Connected, No Internet” even after following the steps?
This is almost always a result of an incorrect initialization sequence. If ZIVPN was started before the hotspot was activated, the routing tables will not point to the proxy gateway. To resolve this: disconnect all clients, turn off VPN Share, turn off ZIVPN, disable your hotspot, wait 10 seconds, and then restart the steps in the exact sequence: Hotspot ON > ZIVPN ON > VPN Share ON.
Q2: Does this proxy method support UDP-based applications (such as online gaming and VoIP)?
Standard HTTP proxies only handle TCP traffic. If your secondary device requires system-wide UDP routing (such as for console gaming, Discord voice chat, or specific video-conferencing software), you must utilize a SOCKS5 proxy configuration. In the VPN Share settings, check if the protocol can be toggled to SOCKS5. If not, you may need a client-side proxyifier wrapper (like Proxifier for Windows) to force-wrap UDP packets into TCP streams before sending them to the host proxy.
Q3: How do I identify the correct IP address if VPN Share displays multiple network interfaces?
VPN Share may list multiple network interfaces, such as loopback (127.0.0.1), cellular IP (e.g., 10.x.x.x), and hotspot IP. The correct IP to use is always the address associated with your local wireless hotspot gateway. On almost all modern Android devices, this is natively set to 192.168.43.1. If you are using Wi-Fi Direct or a modified ROM, it may be 192.168.49.1. You can verify your gateway IP on a Windows client by opening Command Prompt and typing ipconfig, then looking at the “Default Gateway” of your wireless network adapter.